I am going to show you how to add keywords to your website for google search to ensure your website appears in the search results pages when someone searches for them.
It is important to add your keywords to your web pages for Google search bot to understand that it is a relevant page for that search term.
It is just as important not to add the keywords into the page too many times, also referred to as over optimization.
I am going to show you what works for me and how you can do this yourself step by step to your own website.
We are going to use a working example page to prove that it helps improve rankings. I have done this over and over again to rank many websites top of the Google search results pages.
Adding keywords to your website for Google search is also known as on-page SEO or on-site SEO.
It does not take very long to optimize a website for keywords and it can have a very powerful effect on a websites rankings.
Just a few on-page tweaks can have a web page discovered in the search pages that would otherwise be previously not found.
Taking time to get this correct will yield some amazing long term ranking results. Your website will get more traffic from the organic Google search results pages.
This works for local keywords and any general keywords that you might have.
Table of Contents
How to add keywords to your website for google search
We are going to run through this step by step working on the most important on-page changes first.
They are considered the most important things to change because they are most likely to have an impact on your rankings in a positive way.
I have to stress at this point, adding keywords to your website for Google search is just the start of ranking success. You must be aware that backlinks will almost certainly be needed to get a number 1 placement for your keywords.
Important note before you start:
You must record any changes that you make. Put your old Title Tag, headings, and any other changes that you make into a Google doc or notepad on your pc.
You must record your keyword rankings before you start. I have done a guide on how I check my Google ranking, it is completely free.
This way you will know if the changes that you have made have had a positive impact on your keyword rankings.
Be aware that ranking changes will only take place after Google bot has recrawled your website. You can force Google bot to recrawl your website using Google webmaster tools. I show you how to do this in the guide below.
Remember: record your keyword rankings before you start. Always log any changes that you make.
Step 1: optimize the METADATA (Title and Description Tags)
It is incredibly important that your target keyword is in the Title Tag. This is the information that Google displays about your website in the results pages.
The website page we will use as a guide to follow is my web 2.0 backlinks post. The target keyword is web 2.0 backlinks.

As you can see, the target keyword is in the page Title Tag and Description Tag.
It is very easy to edit your METADATA if you are using WordPress as your content management platform. You simply install a plug in and a METADATA section will appear on each website page/post.
I have used many SEO plug in’s and have now stuck with Yoast. You can add this plug in to your WordPress website and you will be able to manage your METADATA with ease. The free version is all you require.

After you have installed the Yoast Plug in simply go to the page/post you want to edit. Scroll to the bottom of the content section and you will notice the “Yoast SEO” data box as shown in the image above.
Go ahead and edit the information making sure that your keyword is in the SEO title section and the Meta description section.
To ensure your title and description tags do not get cut off in the search results page keep them within the required character limits. For mine shown above in the example, the Title Tag uses 50 characters (including spaces). The Description Tag uses 153 characters (including spaces).
Try to stay within those character limits otherwise any other words outside of those will be cut off and the Google user will not see them.
Key points:
- Make sure your keyword is in the Title Tag
- Make sure you describe the contents of the page
- Include a call to action
- Have some emotional words in there (you want the Google user to click your listing, it has to stand out)
- Ensure it is unique
Step 2: optimize the headings (H1 to H6 Tags)
The next step is to add your focus keyword to the page/post headings, also known as the H1 to H6 Tags in the code.

As you can see, I have the exact target keyword in the post main heading. This is known as the H1 Tag.
In WordPress this is the post/page main heading/title of the document, WordPress will automatically add this as your H1 Tag in the code.
The next step is to add your keyword to a H2-H6 heading. As a rule of thumb I do this 1 time only to avoid over optimization.

Using WordPress you can ensure the words are set to “Heading 2”. WordPress will automatically set this as a H2 Tag in the code. I always ensure my H2 headings that include the keyword are set to bold font. This does not have a major impact on rankings, but every little helps.
I am showing you what I do to get top Google rankings, so you can go ahead and do the same thing for your website.
Step 3: keyword density and placement
Not many people talk about keyword density any more, however, it is very important that your keyword is placed into the body content.
As a general rule of thumb I ensure the keyword is mentioned at the top, somewhere in the middle, and close to the bottom of the content.
I will go back and read through the body content and add the keyword into sentences where I think it makes sense to do so, this will be to ensure the keyword density is around 0.6%. Anything around 1% is good, do not be tempted to throw your keyword in there over and over again, it will have a negative impact on your rankings.

As you can see in the image, I have used the keyword in the first paragraph of the blog post.
You have to understand how to add keywords to your website for google search in a safe way. Adding the keyword too many times is called “keyword stuffing” and will harm your website rankings.

The target keyword is used again exactly half way down the post.

The keyword is used one last time right at the end of the post.
If you are using WordPress and Yoast SEO you can scroll down to the Yoast SEO analysis box.

Take a look at the “keyphrase density” section. You should see a green circle next to it, this means your focus keyword is used within the body content the right number of times.
Step 4: URL extension
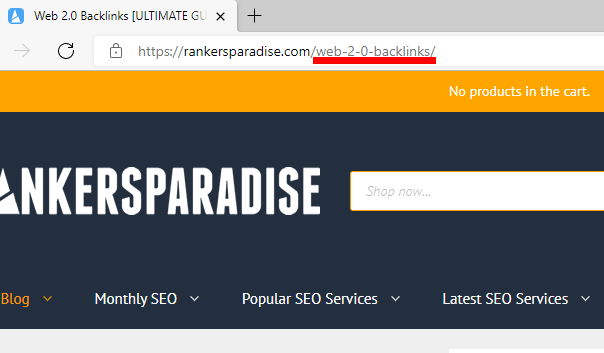
It is good practise to have your focus keyword in the URL.

As you can see, I have the exact keyword in the URL extension. Of course, if you are optimizing your homepage then this will not be applicable, unless you are using an exact match keyword domain name.

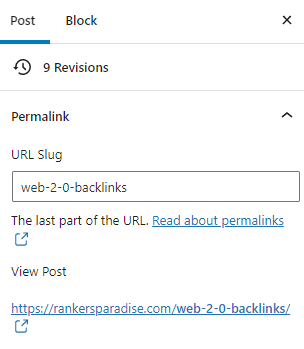
You can change the URL extension with ease if you are using WordPress. Simply select the “Post” block and edit the “Permalink” section.
Ensure the “URL Slug” contains your keyword. Simply update your post/page and you are done.
Step 5: add keywords to image ALT Tags
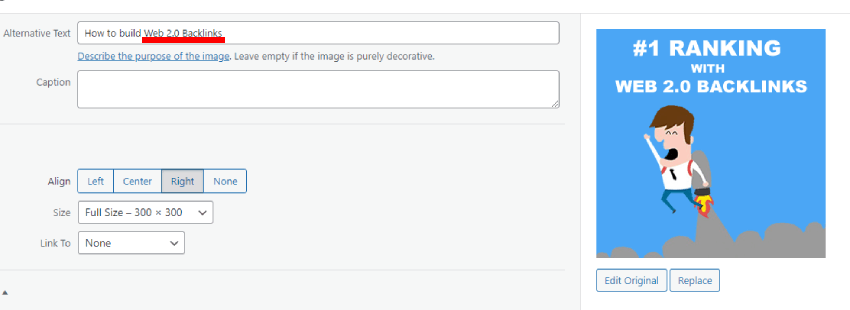
I always add the keyword to one image ALT Tag. The image Alt tag is your chance to describe the purpose of the image. The ALT Tag can be seen in the code, Google bot will read this, it is another way to hint what your page is about. This gives you another opportunity to work in your keywords. Do not do this too many times, or you will over optimize the post/page and it will not help your rankings.

As you can see, I have used the exact target keyword in the Alternative Text section. I do this once only to avoid over optimization.
If you are using WordPress the ALT Tag is very easy to edit. Simply select the image, ensure you have the “Block” section selected and scroll down to the “image settings”. There you will be able to edit the Alt text (alternative text).
Step 6: have Google re crawl your website for higher rankings
To force Google bot to re crawl your website you will need to have a Google Webmaster Account, it is now known as Google Search Central.
Head on over to Google Search Central and create an account or login. If it is a new account you will need to add your property, follow the on-screen instructions to get this done.
In the Google Search Console account you can have Google bot inspect a URL.

Enter the URL that you have just recently optimized by adding keywords to it. This is done in the “URL inspection” section as shown in the image above. As you can see, I have the Rankers Paradise website property selected. Then hit the search icon.
Google Console will then retrieve data about that web page from the index.

To have the post/page re crawled you can click on the “REQUEST INDEXING” text. Google bot will re crawl the web page and your optimization work will have an effect on your keyword rankings.
It will take some time to get results from making these on-page changes, even when you have the page re crawled like this. This is because you will need to wait for Google bot to update the index. This can happen overnight, or it might take a few weeks. Be patient, your changes will help get your keywords better placements in the Google search results pages.
How will you know when Google bot has read the on-page changes?
You can use Google. Drop your URL into Google search, you will notice that the page/post Title and Description have changed. This is of course if you changed the METADATA.
If you did not change the METADATA you can use Google Console. Click on the “VIEW CRAWLED PAGE” text after performing a URL inspection and you will see the new page showing your optimization work.
Quick guide: no time to read the full post?
Here is a quick checklist of everything that we have covered. You can use this to speed up the process when you run through each page on your website.
- Add keyword to Title and Description Tags (METADATA).
- Add the keyword to the main heading (H1 Tag).
- Add the keywords to one sub heading (H1 to H6 Tag). Make it bold font.
- Add the keywords at the top, middle, and bottom of the post/page. Ensure keyword density is around 0.6% and no higher than 1%.
- Add the keywords to the post/page URL extension.
- Add the keyword to one image ALT Tag.
- Submit the optimized URL to Google Console for re crawl.
That’s everything you need to know on how to add keywords to your website for google search for higher rankings.
As always, if you have any questions drop a comment below and I will get back to you.