 I am going to show you how to automate your backlinks for free.
There is a super cool PBN, web 2.0 and Social Bookmark automation service called Rankwyz.
This service combined with Kontent Machine is super powerful. However, you do not require Kontent Machine.
Everything can be done for free on auto pilot.
If you do not have the funds to buy Kontent Machine you can use my free blog content generator method along side the free Rankwyz account.
Basically, what we are going to do is load 10 articles into Rankwyz.
Rankwyz will then upload these articles including images and videos to 10 web 2.0 sites of our choice on auto pilot.
The service will either create new web 2.0 sites for you, or you can use your own web 2.0 sites.
For this tutorial I am going to use Rankwyz to post content to 10 expired Tumblr accounts that I have registered under one email address.
Now we can generate index able content really fast and upload it onto our web 2.0 sites super quick.
This means we do not have to log into each Tumblr blog and upload the content manually, the Rankwyz service will do it for us, even on a free account.
Before we start getting those backlinks we need 10 expired Tumblr blogs all registered under one email account. To learn how to scarpe expired Tumblr blogs for free go here.
When you have your Tumblr blogs registered and ready to roll we need some content to put on them.
Use my free blog content generator method to do this.
If you have Kontent Machine you can skip the content generator part because it integrates with Rankwyz. All you need to do is integrate Kontent Machine with Rankwyz and start the process below, getting the content uploaded onto those blogs.
Take a look at this video on how to integrate Kontent Machine with Rankwyz;
Now you must have the following before we crack on:
- 10 expired Tumblr blogs (or any web 2.0 blogs of your choice)
- 10 pieces of content (unless you are using Kontent Machine)
Let’s get started;
How To Automate Your Backlinks
Get on over to Rankwyz.com and sign up for a free account and log in.

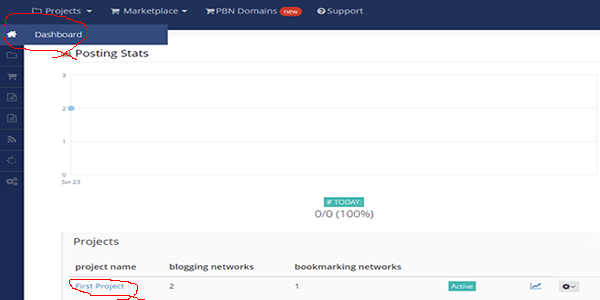
You will be presented with the Dashboard. If not click the “home” icon and then select “Dashboard” (circled red).

Now click on “first project” (circled red).
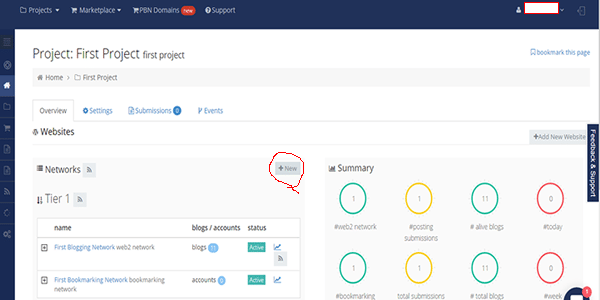
Now click the “+ New” button (circled red) opposite the “Networks” heading.

Make sure that you have “Web2 Network” selected. Make sure that it is marked as Tier 1. Then enter your network name and description as I have done. Then hit the “+create” tab.
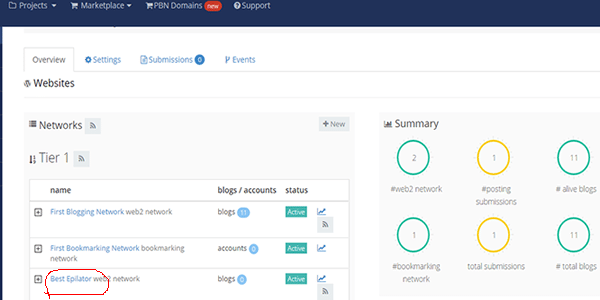
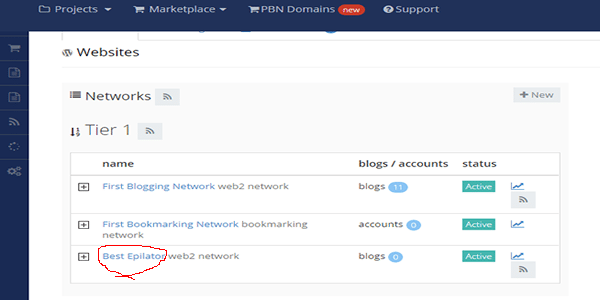
Now click on the Blue anchor text, the name of the network that you just set up (circled red).
Now we have our network ready to roll.
Next we need to add the content to the network.
Then we need to add the expired Tumblr blogs or any web 2.0 sites to the network.
You can add any web 2.0 sites to the network that you want backlinks from.
This is how you do it;

Make sure you have the “Submissions” tab selected. Then select “+New Bucket” (circled red).

Name your content bucket. Make sure that you select “Own articles” and then hit the “save” button. You could also sign up for ArticleBuilder.net, which will create unique articles for you, saving you lots of time.
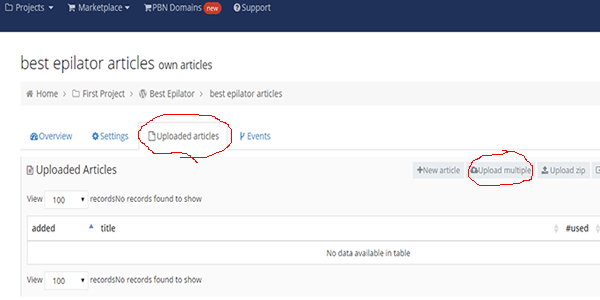
Make sure you have the “Upload articles” tab selected. Then click on the “Upload multiple” (circled red).
Make sure that your content documents are saved as a .txt and not .doc or they will not upload.
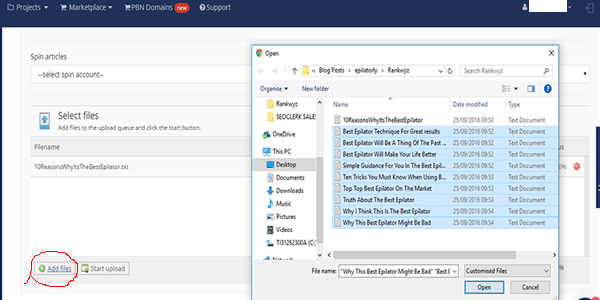
Scroll down to the bottom of the page and click “Add Files” (circled red). Select your 10 content files and click “open”. Then hit the “Start Upload” button.

Now you will see your 10 articles uploaded in the “Uploaded articles” tab. Now we need to tinker with the settings to tell Ranwyz how to upload these articles to our expired Web 2.0 sites.

Click on the “Settings” tab (circled red). Now scroll down. We are going to tell Rankwyz to insert scraped images and videos into our Web 2.0 posts.

This is how I set up the image settings for my content. Make sure that you have “include images” and “include videos” selected.
Rankwayz will scrape images for you and add them into the post on auto pilot. So select “scraped images/videos”. You can use your own, but I don’t see the point here.
Select your image category and the position you would like Rankwyz to place the image within your content. Then select the number of images that you want Rankwyz to add to the content. 1 is enough for my posts.

Ignore the Links tab settings. Just make sure that the “insert links” radio is not selected. We will set up our anchor text profile for our links later.

Now let’s sort out the Advanced Settings. Select a language, I put in do not translate. I put “best epilator” in the Tags list, selected the “random” radio button and selected to have 1 tag per post.
I did not add anything to the categories list, I just made sure “random” was selected.

Scroll back to the top and hit the “Save” button.

Click on the “Overview” tab. Then click the “Status” drop down menu at the right hand side of your screen and select “active”. We need our articles to be active for them to upload to our Web 2.0 sites.
Now it is time to add our Web 2.0 blogs to the network.
Go back to your dashboard by clicking the home button. Then click on the “First Project” link again.
Now click on your network link.
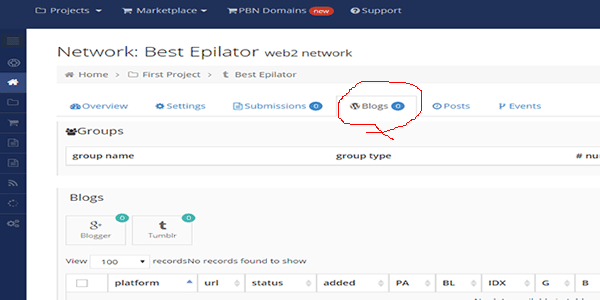
Now select the “Blogs” tab (circled red).

Now click on the “Tumblr” tab (circled red). If you want to add any other Web 2.0 blogs to your network just click on the “+Add” tab to the right of your screen.
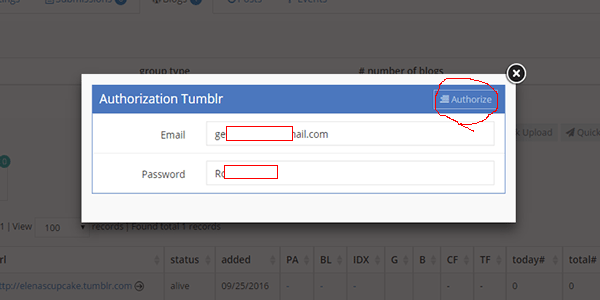
Now add your Tumblr account Email and password and then hit the “Authorize” button (circled red). This will add all 10 Tumblr blogs registered under that email to your Rankwyz account. You can add blogs individually by using the “+Add” tab as shown above.
After you click “Authorize” you will be taken to Tumblr, just login.

Now click the “Allow” button to give Rankwyz permission to post to your Tumblr blogs.

Now you will see all your Tumblr blogs or your selected Web 2.0 blogs in your network, all ready to post your content to.
Now it is time to post your content to the Web 2.0 blogs on auto pilot.
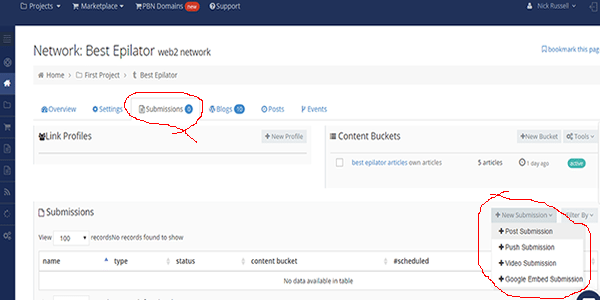
Click on the “Submissions” tab. Then select “New Submissions” and then select “+Post Submission”.

Enter your Post submission name. Then select to use “My Content” and select the name of your content bucket that we set up earlier, this is where we uploaded our 10 pieces of content.
Now select Post to: “all blogs in network”. I selected “sequential” posting.
Then select the number of posts you want per blog. Set this to 1, and then select the “posts on each blog” radio button.
I leave the “spread posts” and “repeat posts” un selected. You can select the “Spread posts” radio to give a set time to post to your Tumblr blogs e.g Rankwyz will post your 10 artciles to your 10 blogs over a 1 hour period or more. I just want them all posted right away, so I do not select this option.

Scroll down to the link settings.
Pop in the URL of your money site, the site you want your Web 2.0 blogs to backlink to. Then enter the anchor text that you want Rankwyz to use on every post. I used the anchor text as follows;
Anchor Text:
best epilator
epilatorly.com/best-epilator/
click here
best epilator
www.epilatorly.com
go here
best epilator
epilatorly.com
visit this site
best epilator
Leave the rest of the options under the “Link Settings” tab un-checked.

Scroll down to see the “Send successful post tab”. You can send the successful post to boomarking, blogging and social networks if you want to. I leave these un-checked because I have not set them up and think it is not necessary here.
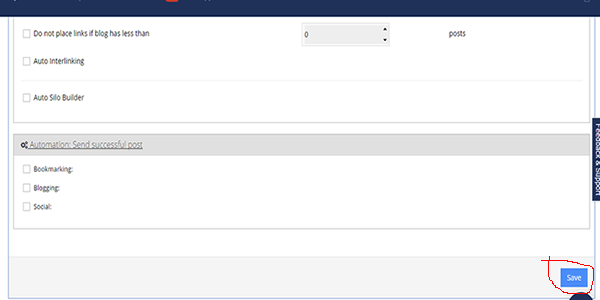
Now hit the “Save” button (circled red).

Now hit the “Activate” button (circled red).

Now click on the “Posts” tab. You can let Rankwyz do it’s thing, it will publish your articles to your Tumblr blogs or any Web 2.0 blog that you selected on auto pilot.
To speed the process up you can hit the “Post Now” text (circled red) and Ranwyz will instantly post content to that Tumblr or Web 2.0 blog.
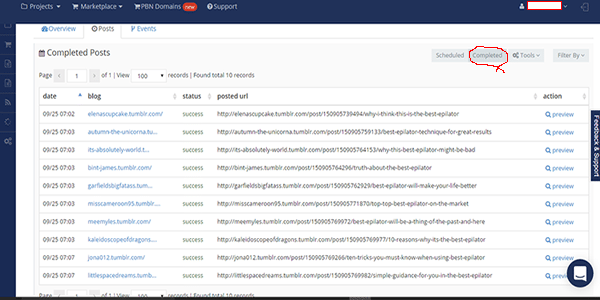
Click on the “completed” tab (circled red) to see all your completed Tumbr and Web 2.0 blog posts all done on auto pilot.
You can click on the blog link to check out your blog post.
How cool is that. Rankwyz will have used your selected anchor text profile and inserted a scraped image and video into the post for you completely on auto pilot.
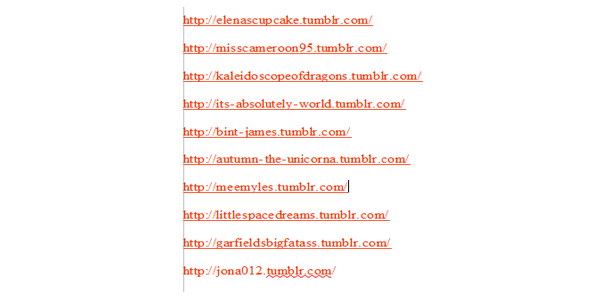
If you want to take a look at the blog posts that Rankwyz did for me here are the URL’s;
How cool is that. You can now auto generate content and even auto post the content to your Web 2.0 blogs for free.
That’s how you automate your backlinks. Of course if you get articlebuilder.net or KontentMachine.com the whole process will be even faster. How awesome is this, you can now get Web 2.0 backlinks on ten posts in super quick time.
If you don’t have time to scrape expired Tumblr blogs with high page authority and lots of backlinks pointing to them use this gig on seoclerk.com. He gave me 75 expired Tumblr blogs for just $5. All I had to do was register them, I did that under some mail.com email accounts for free.
Get Those Backlinks Indexed
Now you have 10 new backlinks from high page authority web 2.0 sites with lots of backlinks pointing to them.
These links are worthless unless Google knows that they exist.
The easiest way to get these backlinks indexed is to use Google console.
Simply sign up for a Google account, you require one to use Google console.
Then Google search “add url to google” and click on the top listing.
Then log into your Google account.

Add your Web 2.0 URL into the text field and then hit the “Submit Request” button.
Now go back to Google search and enter your Web 2.0 URL into the search bar.
If your Web 2.0 appears in the search results you are set to rank. Google is aware of your new backlink and your ranking will improve very soon.
Go ahead and automate your backlinks now, it is free to do, so why not.
This method is going to save you loads of time and will be a real game changer for most people.
If you are a one person ranking machine you are going to love this method.
Let me know how you get on in the comments.
It’s great to know I’ve been able to help you in some way! SEO doesn’t have to be expensive—you can achieve results by working on it yourself. The only downside is that it can be very time-consuming, and you’ll need a lot of patience to see the results.
Thanks for sharing, just what I needed for free.
Thanks for sharing this info and keep it up! I have tried the free option and now FCS Networker is gone it’s the only option.
thanks for this awesome article.
for this method and all other methods you told in your various posts where we are creating new or expired web 2.0 properties do we need to use separate google search console account for indexing of every web 2.0 property along with different email and different ip addresses ?
Thanks for sharing, just what I needed for free. This is very helpful with us, we needed to automate some tasks for backlinks and this is just perfect.