
I am going to show you exactly how you can track bought backlinks in Google Analytics 4 (GA4). Follow this guide step-by-step to isolate, track, and prove the referral traffic and conversion value of your paid link building campaigns.
Many people believe that when you buy backlinks, you can only track the results by looking at a keyword rank tracker or checking your organic impressions inside Google Search Console.
While pushing your organic rankings to the top of the SERPs is the main goal, tracking the direct referral traffic from those links inside GA4 is incredibly important. It helps you see which bloggers, niche edits, and guest posts are actually delivering real human visitors to your money site.
To prove that you can track these links properly, I will break down the exact configuration you need to use inside GA4. You can follow this guide for free to get total control over your link data.
Before we go any further, you must ensure your content is perfectly optimized. Your content alone will not rank #1 if you do not understand your data.
Why Generic GA4 Guides Will Waste Your Time
If you go and search Google right now for GA4 referral tracking, you are going to get a bunch of dry, boring corporate blogs telling you how to track generic traffic.
None of them understand SEO. They don’t know what a tier-based backlink framework is, and they certainly don’t know how to track a niche edit or a guest post without messing up your main data profile.
When you purchase placements, they automatically show up in GA4 as generic “referral” traffic. The problem with this is that your paid links get mixed up with your natural outreach links, social media traffic, and random scraper sites that crawl your blog.
If you do not separate them using the methods I am about to show you, you will have no idea which paid link provider or specific guest post is driving the best return on investment (ROI).
Let’s look at the two exact strategies we use to map this out perfectly.
Strategy 1: The Safe UTM Tagging Method for Paid Links
If you are buying guest posts, contextual links, or editorial links where you have complete control over the final anchor text and the destination URL, you should use custom UTM parameters.
Go ahead and use the official Google Campaign URL Builder to tag your target money site URL before you send it over to the link seller or post it yourself.
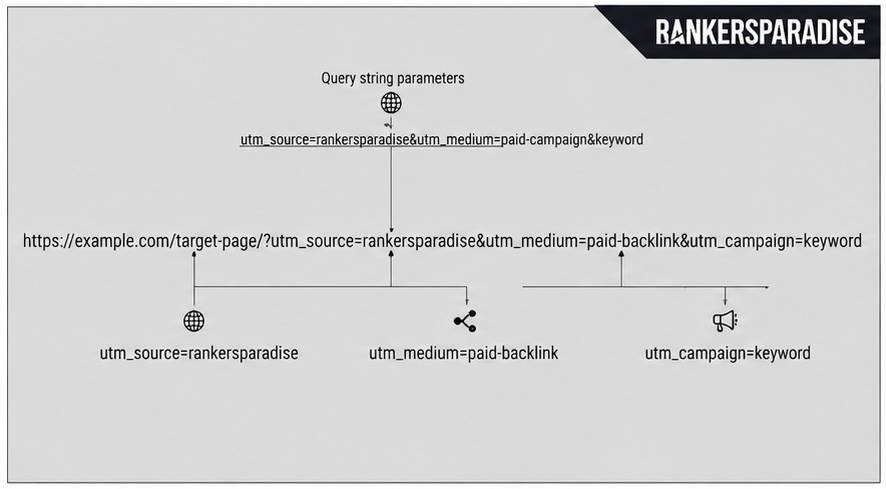
Make sure you structure your parameters exactly like this:
-
Campaign Source (
utm_source): Use the name of the vendor or platform (e.g.,rankersparadise). -
Campaign Medium (
utm_medium): Use a specific tag likepaid-backlinkorguest-post. -
Campaign Name (
utm_campaign): Use your target keyword for that specific URL.
By doing this, when a user clicks that link on the host site, GA4 will not dump them into the generic “Referral” bucket. Instead, they will show up under your Custom Campaigns report. You will be able to see exactly how many seconds they stayed on your site (dwell time) and if they converted.
Nick’s Pro Tip: Do not use UTM parameters on every single link you buy. If you are building an automated tier 2 setup or heavy blasting packages, keep those clean. Use UTMs specifically on high-quality Tier 1 guest posts where you want to measure active click-through rates and traffic quality.
Strategy 2: Creating a Custom Referral Segment in GA4 (No UTMs Needed)
What happens if you buy a niche edit (curated link) or a foundational link placement where you cannot use a UTM tracking code? If you use a UTM on a niche edit, it looks completely unnatural to the Google search spider because you are editing an old piece of content with a tracking parameter attached to it. Don’t do it.
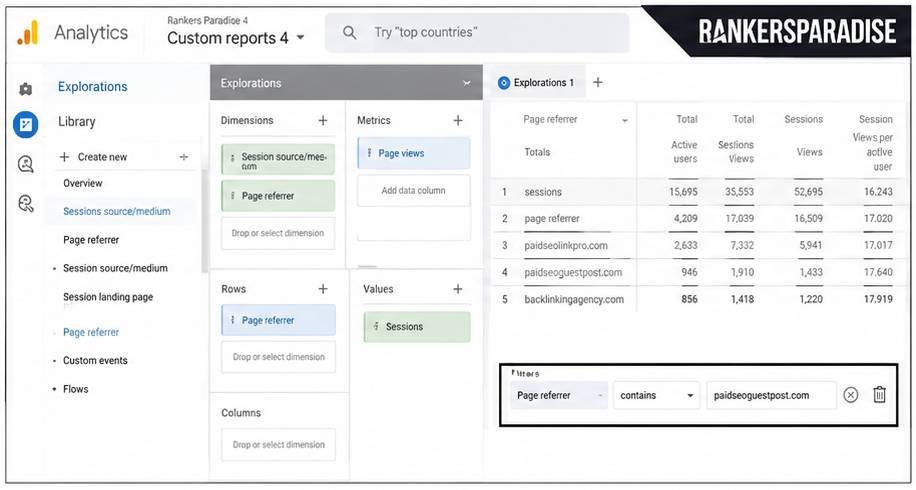
Instead, we keep the link completely clean and isolate the specific referring domains inside the GA4 Explorations dashboard.
Follow these steps to build your custom tracking report:
Force Google Bot to Crawl Your New Links
Once you have your tracking set up in GA4, you need to make sure Google bot actually finds the pages where your backlinks are sitting. If Google search spiders do not crawl the links, they will not pass authority, and they definitely won’t show up in your GA4 referral reports.
If you are using WordPress for your money site, make sure you use the Rank Math Instant Indexing Plugin to submit your new content URLs to the API immediately.
For the third-party blogs or web 2.0 sites where you just built links, you can push them to index by sharing those URLs across your web 2.0 link wheel or using standard indexing tools to ensure they get crawled fast. For an alternative strategy on launching foundation properties, check out my complete guide on how to use web 2.0 sites for backlinks.
Anchor Text Management Checklist
When you are tracking traffic from these links, remember to monitor your overall anchor text profile. Always stay aligned with Google’s Webmaster Guidelines on Link Schemes to ensure your link-building practices stay safe and effective. Do not over-optimize your content by using your exact match keyword on every single bought link.
Keep a clean mix of:
-
Full Open URLs (e.g.,
https://rankersparadise.com/) -
Brand Names (e.g.,
Rankers Paradise) -
Page Title Tags (the exact title of your post)
-
Generic Text (like “click here”, “go here”, or “website”)
Only use your exact target keyword as anchor text in 1 out of every 5 links (a clean 20% ratio). This keeps your link profile completely natural to the Google spider while you monitor the traffic growth inside your newly created GA4 dashboard. For a deeper look at expanding your outreach safely without budget, feel free to read through my list of proven free backlinks.
Summary: Tracking bought backlinks in GA4 comes down to clean organization. Use UTM parameters when you can safely control the link creation on Tier 1 guest posts, and use custom GA4 Explorations with
Page referrerfilters when tracking existing niche edits or editorial placements.