 I was asked to take a look at the sheerseo.com online seo checker tool.
I have been told it is the best seo analysis tool around, so I thought I would give it a try.
You will be happy to know that it comes with a free 2 months trial, so it’s worth taking a look at.
The best seo tool needs to be able to cover all aspects of seo, and this tool appears to do just that.
The tool covers on page analysis as well as backlinks.
Most seo tools lack in one department or another, so let’s see if this one has everything that is needed to achieve top ranks and stay there.
So what does the tool offer?
- On Page Optimization
- Social Tracking
- Backlinks Management
- Rank Tracking on all major search engines
I can see right off the bat that it is missing one crucial aspect that any seo tool requires, which I will reveal next.
SheerSEO.com SEO Checker Tool Analysis
So what’s the first thing anyone does when they start a new project?
They go right into keyword research, yes you have guessed it, sheerseo.com does not have a keyword research tool built in there.
This is a big let down right away for me when I am looking for a complete seo tool to use online.
So you are going to have to use another tool for keyword research, Long Tail Pro is the best out there.
Okay, so we have our keyword and our content in place. How can sheerseo rank us top.
First of all we need an on page analysis, which the tool does do.
Let’s take a look at this.
On Page Optimization Tool
I chose to analyze this particular post because it is ranker no. 1 for my selected keywords.
Let’s see how the sheer seo tool rates my content and take a look if I need to make any on page changes even though I am ranked top.
This will be interesting…..
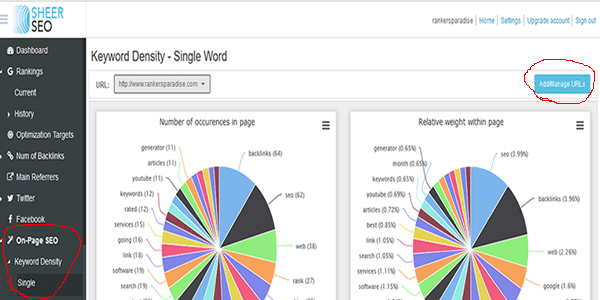
It looks very straight forward to use.
Simply select the “On-Page SEO” tab and select the “Single” page option
Then click on the “Add/Manage URLs” button.

Now put the page you intent to monitor for on page seo into the “Monitored Pages” box and hit the “Submit Changes” button.
Now select the On-Page SEO tab again from the left hand navigation panel.
We then have three on page seo options.
- Keyword Density
- Content Benchmark
- Page Optimization
First of all we are going to look at the keyword density of my selected post
So go ahead and click on the “Keyword Density” tab and select “Single” again.
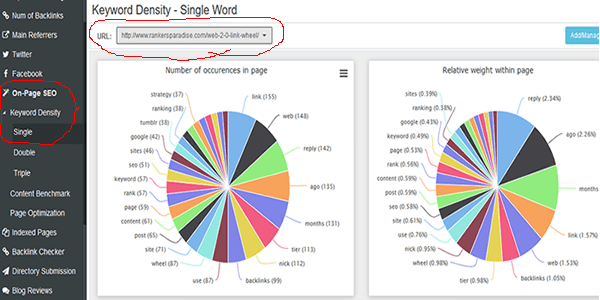
Make sure you select the correct url to analyze as show in red on the image above.
Now you will be displayed two graphs. Let’s take a closer look at them
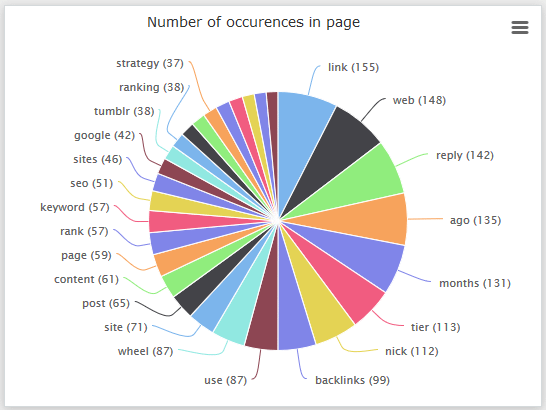
You will see two graphs on the page. This is the left graph, which shows the number of times words appear on the page.
My page is ranked top for the keyword “web 2.0 link wheel”.
The chart shows that these words feature in my content as follows:
- web – 148 times
- link – 155 times
- wheel – 87 times
It’s not showing how many times “2.0” is featured in the post because it is not a word.
The next graph shows you how you can make use of this information.

Okay, this is the graph you will see on the right hand side of your screen.
This will help you make sense of it all.
The graph shows keyword density in percentage form, the volume that each keyword is used on the page in relation to your content length.
So let’s take a look at the results:
- web – 1.53%
- link – 1.57%
- wheel – 0.98%
I always aim to have my keyword density below 1%.
I write natural and check at the end, making sure the keyword is featured within the content at the top, in the middle and at the end somewhere in the last paragraph.
If I wasn’t already ranked top, how would I use this information?
I would certainly reduce the number of times the words “web” and “link” are used on the page.
Get them below 1%.
That’s the keyword density tool covered.
Very useful if your site is stuck on page 2 of Google search and you are sat wondering what the hell is wrong with my site, why won’t it move onto page 1.
Let’s move onto the next part of the on-page optimization tool.

The next on page analysis tool is very useful indeed.
It is called “Content Benchmarking”.
This is going to compare your content against the top ranking sites content and lets you know what needs to be done to get your site on the first page too.
So, you select “Content Benchmark” from the left hand navigation panel and enter the keyword you want to rank top for and your URL.
Then hit the “Analyze” button and let the magic begin.

After a few moments you will receive a table showing details of how your content relates to the top ranking sites.
The results will help you optimize your content for a top rank.
As you can see, my post uses the keyword “link” 1.57% of the time, the top ranking sites use it on average 3.11% of the time.
So you can go ahead and make the necessary changes to your content until it matches the top ranking sites for your selected keyword.
Now let’s take a look at the final on-page seo tool.

The last part of the On-Page SEO section is the “Page Optimization” tool.
Select that from the left hand navigation panel.
Enter your keyword and URL, then hit the “Analyze” button.

Okay, here are the results for my on-page seo.
Bear in mind my page is ranked top for my selected keyword, it is still saying there are improvements to be made.
The tool states that my keyword density is too low, it is below 1%, which is good enough for me.
The tool states that your keyword density should be between 1 and 5%, which I disagree with.
The tool is also telling me that me keyword is not showing exactly in the TITLE, however, it is there, I have picked a bad keyword here for this analysis.
Also states my keyword is not in the URL or in the META TAG. This is because of the “point” in “2.0” which I can’t put into the URL.
Like I say, it’s a bad keyword for this tutorial.
It will work like a charm on any regular keyword 🙂
So that’s the on-page seo tools covered, let me know what you think of them by dropping a comment or two below.
Will I use these features again in the future, yes of course I will.
But if you have an seo plugin installed on WordPress like seo Yoast you will have most of the on page seo aspects covered anyway, including keyword density.
The “Content Benchmark” feature is something that I will use again, where I can compare my content to that on the top ranking sites for my selected keyword.
All the rest is covered by Yoast, and is analyzed as I write my content.
I will use the “Content Benchmark” feature again, that is for sure.
Okay, so we have our content optimized to the max for a top ranking, what is next?
Well for me it is social promotion.
I like to get my post on social media and get some traffic flowing to it right away, and most importantly so Google Bot can find and index my new content.
So let’s take a look at the “social tracking” feature next.
Social Tracking
This tool is very basic and does basically what it says on the tin.
There is no feature there to help me promote my content on social media.
There is no tool to show how my competitors are promoting their content on social media.
To complete the tutorial I will show you what the seo checker tool can do here.
It only shows social engagement for two social platforms:
For me it is missing the most important platform, Google Plus.
I also regard Pinterest very highly too when promoting content to achieve top ranks to gain quick and easy backlinks to my sites.

The tool shows me the number of Facebook shares, likes and comments that my post has got.
I can go ahead and improve on this if I think things are too low, which of course will send traffic to my post and in time improve my website ranking.
You can do the same with Twitter.
Simply click the “Twitter” tag on the laft hand navigation panel and see all current Tweets about your content.
You can even look at historical Tweets.
This section could be greatly improved upon.
There should be a feature to promote your content right across social media including Google Plus and Pinterest.
I can add a social count plugin to my sites for free and get the same results here.
I won’t need to use this tool again.
Let’s move on and take a look at what else the tool has to offer me.
After my content is optimized, social promotion is complete, the next thought in my mind is backlinks.
First I start with easy backlinks to start the process off, from web 2s and directories etc.
Then I move onto the backlinks that really matter;
Contextual backlinks from niche related sites, their is no better backlink than this.
If the tool can help us do this then it is certainly worth investing in.
Let’s take a look…..
Backlinks Management
The tool does offer a way to build backlinks.
Their are two options available here:
- Directory Submission – Paid and Free
- Niche Related Blog Backlinks
Everything looks good so far.
First of all lets take a look at getting some backlinks from directories.
The first thing you need to do is set up a profile for your blog.
This is how you do it.
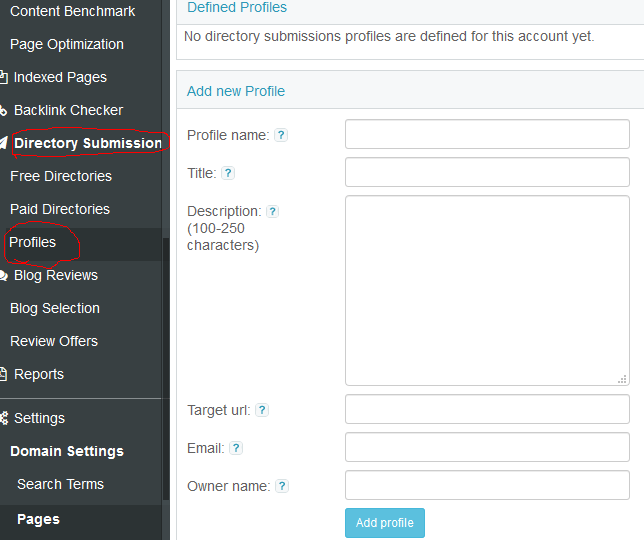
Under the “directory submissions” tab select the “Profiles” option, circled in red.
Now fill out the details for the URL you want backlinks to from directories.
Then hit the “Add profile” button.
Now let’s get some backlinks from some directories.

Select “Directory Submission” from the left hand panel, then click on “Free Directories”.
Their is also a paid directories option, which follows the same process, but of course you have to pay to gain access.
Make sure your profile is selected that we set up earlier.
Select the directories you want backlinks from, you can post to 10 at a time.
Then hit the “submit” button.
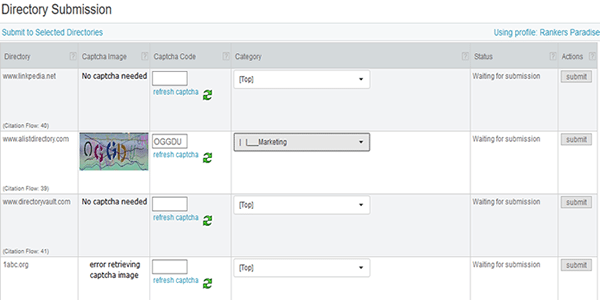
Next you will need to solve the directory captcha and select the category you want a backlink from.
Then, once again, hit the “submit” button to get that free and easy backlink in place.

If everything goes to plan you will see a “successful submission” sign. You now have a backlink from a directory in place from a niche related category 🙂
The nest part of the tool is most interesting.
It is going to help you get contextual backlinks from niche related sites.
These are the best backlinks that you can get, there is nothing better.
Okay, so how can the tool do this for us?
Let me show you.
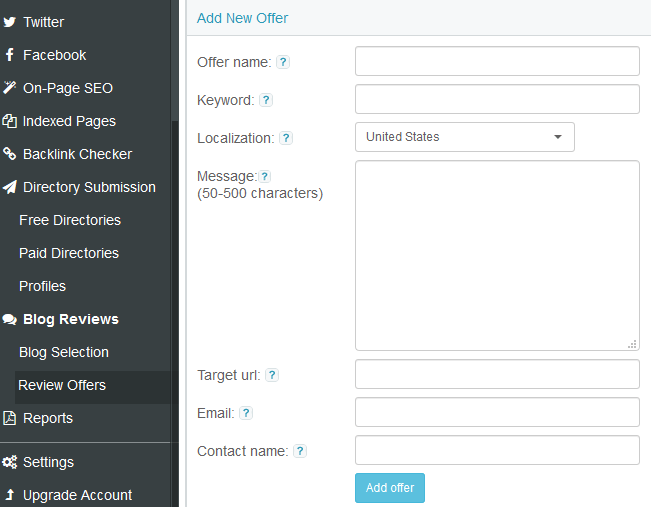
Select the “Blog Reviews” tab from the left hand navigation menu.
Now click on “Review Offers”.
Fill in the details, then click the “Add offer” button.
So what will this do for you?
This form will find niche related blogs and message the blog owners for you.
What you enter into the form determines the message that is send to the site owners, and of course which sites are contacted.
So take your time to fill out the form carefully.
Now when you get an offer of a backlink from a niche related blog, it will show in the “Blog Section” under “Blog Reviews” on your sheer seo dashboard.
Pretty simple, sit back and wait for the backlink opportunities to come rolling in.
So we have our on-page seo taken care of, our social promotion and backlinks are in full swing, what’s next.
We need to track our ranking.
Every seo checker tool needs to have a rank tracker, sheer seo does have one, let’s take a look.
Rank Tracking
Ranking tracking is very easy with the sheer seo tool.
You simply enter your URL, keywords, select the search engine and the results are shown within a few seconds on screen.
![]()
Select “Rankings” from the left navigation panel and click on “current” or “History”.
You can select the “Add/Manage Keyword” button to track more keywords, or remove them from the system.
There is an option to select the search engine you wish to track your ranking on.
Sheer seo tracks rankings on all major search engines including:
- Bing
- Yahoo
As you can see, I am ranked number 1 for my selected keyword.
You can export your results for future reference.
That’s pretty much everything that is seo tool has to offer.
Do I think that this is the best seo analysis tool on the market right now.
It is right up there with the best of em, however I would like it to have a few extra features in there.
Most of the features can be got for free elsewhere, there are free rank tracking tools and free on page seo anlysis tools.
Sheer seo is only free for 2 months, the cheapest package is $7 a month, which gives just 5 directory submissions and the tracking of 20 keywords.
I have been around in seo long enough to know that I would not pay for this tool right now.
With more features added to it I would consider looking at it again, but right now it’s not for me.
The feature to compare your content to the top ranking sites is good, however I have a tool which can do this for me for free.
Same with rank tracking and on-page seo, all can be done for free.
The best part of the tool is the Blog Reviews section.
The tool can help you get niche related contextual backlinks, which is some serious ranking power.
It is a pretty good seo checker tool, which is well worth giving spin on the 2 month free trial.
Definitely one of the best tools to test a website on-page seo. I gave this a try and it’s easy to use, unlike other tools out there. Thanks for sharing Nick.
Hello Nick,
this is not directly connected to this article, I am sorry for that.
I want to ask you if you have experienced lower conversion and unusually low revenues during October?
People in Amazon forum are complaining about such things implying tracking problems.
Hi nick sir, thanks for the sheerseo 🙂 . May me write a post about expire domain, how to choose an expire domain for using as moneysite.
Good stuff and great info. Thanks for sharing.
this one is helpful
Thanks for the review, I have been looking for a rank tracking tool for some time. I will give the free trial a go and will continue with the service if it is any good.